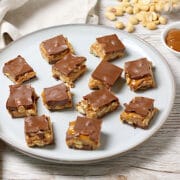
Homemade Peanut Butter Oh Henry Bars
These Homemade Peanut Butter Oh Henry Bars are a DIY version of my favorite candy bar with milk chocolate, peanuts, caramel, and peanut butter.
Servings: 36
Calories: 126kcal
Equipment
- Spatula
Ingredients
- 1 cup smooth natural peanut butter well mixed
- ½ cup powdered sugar
- 1 teaspoon cold water
- ¼ teaspoon kosher salt
- 2 cups milk chocolate candy melts or real milk chocolate (see note)
- ¼ cup spreadable caramel see note
- 1 cup roasted unsalted peanuts
Instructions
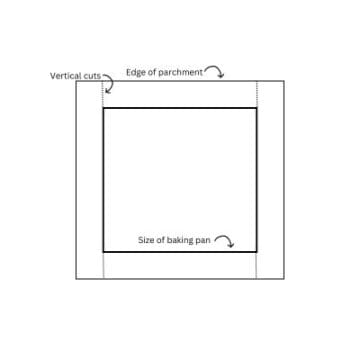
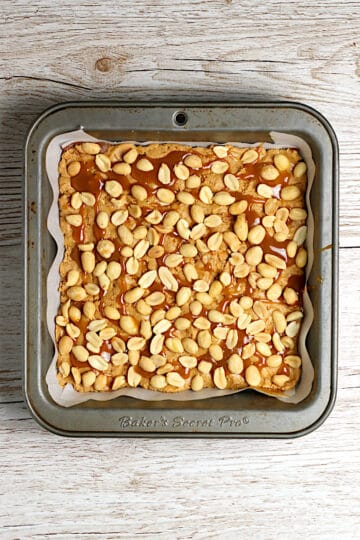
- Prepare a 8x8" baking pan by lining it with parchment paper (cut the parchment paper about 1-2" larger than the bottom of the pan, and cut slits in each corner to help the parchment paper fit the pan).
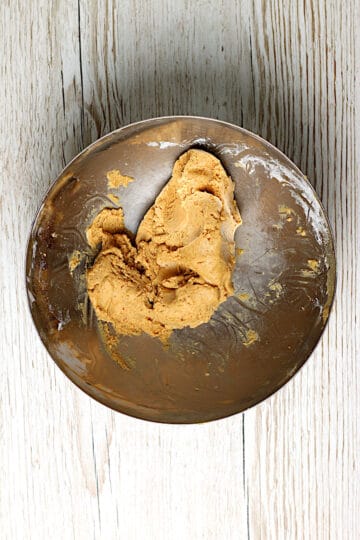
- In a medium bowl, stir together 1 cup smooth natural peanut butter, 1/2 cup powdered sugar, 1 teaspoon cold water, and 1/4 teaspoon kosher salt with a spatula. Note that the mixture should become very thick and dough-like (once it starts thickening, you might find it easier to knead it with your hands). Taste the mixture. If you like your peanut butter filling to be a little saltier, add up to 1/4 teaspoon more salt.
- Melt the 2 cups milk chocolate candy melts in a medium, microwave-safe bowl in 30-second increments at high heat, stirring after each 30 seconds. Mine was done after 1 minute. Spread half of the melted chocolate over the bottom of the parchment-lined baking pan, ensuring it reaches all of the corners.
- Place 1/4 cup spreadable caramel in a small, microwave-safe bowl. If it's quite thick, microwave it until pourable in 10-second increments (note that caramel heats up very quickly, and can burn easily - don't overdo it). Drizzle half of the caramel over the chocolate.
- Sprinkle 1/2 cup of the peanuts evenly over the chocolate and caramel.
- Spread all of the peanut butter mixture over the peanuts (I found that the easiest way to do this was to scatter pieces of it evenly over the peanuts, then gently press them smooth with a spatula).
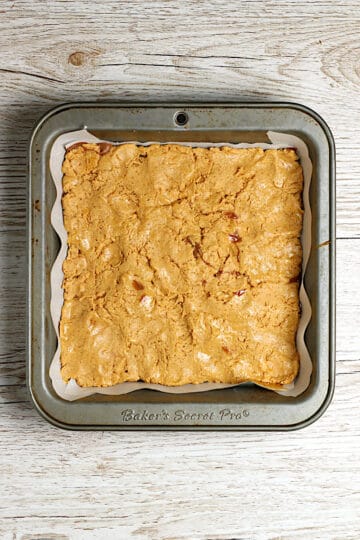
- Spread the remaining 1/2 cup of the peanuts over the peanut butter mixture, then gently press them into the peanut butter with your hands or a spatula. Drizzle the remaining caramel over the peanuts (microwave for 5-10 seconds if it's beginning to harden again). Spread the remaining chocolate over the caramel (microwave for 15-20 seconds if it's starting to set), ensuring to cover all of the peanuts. Bang the pan firmly on the countertop a few times to help smooth the chocolate.
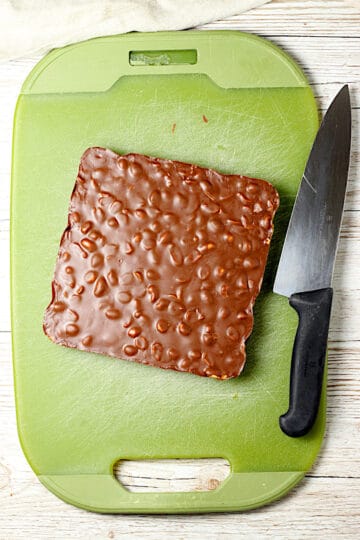
- Set the pan somewhere cool to set, but don't leave it too long because it will become difficult to cut if the chocolate sets fully. You can either leave it in the fridge for 5-10 minutes, or at room temperature for 30 minutes. Try to cut the squares when the chocolate is set enough to keep its shape, but before it's completely solid. If it does set, you can either try to put it in a warm spot for 5-10 minutes (try your oven with the light on), or cover the pan with foil and use a blow-dryer on low to gently heat the top and bottom of the pan (make sure to keep the blow dryer moving, and not heat one spot too long).
- Cut the squares into small pieces. For the cleanest cuts, you can fill a tall container (a tall measuring cup or pitcher) with hot water. Dip the knife into the water to warm it up, then wipe the blade dry. Repeat this after each cut. Store the squares in a cool spot in an airtight container or zipper bag. For extended storage, put them in the fridge or freezer.
Notes
You can use real milk chocolate instead of candy melts, but if you don't temper it, it will melt very easily at room temperature. In that case, I would recommend keeping your finished bars in the fridge. If using real milk chocolate, add 1 Tablespoon of coconut oil to ensure that the melted chocolate is thin and spreadable.
Look for caramel that has a spreadable texture, which would commonly be found in a jar or tub (sometimes found in the produce department to dip apples in). Caramel sauce that is a thinner, pourable consistency (usually found in squeeze bottles) would probably work, but I believe it would run out of the finished bars. I used Comtes de Provence Salted Butter Caramel, which is (or was) available at Costco in Canada. You could also make your own easy caramel by melting vanilla caramels (those cubes wrapped in cellophane, eg Kraft caramels) and whipping cream together (I would suggest using about 1/2 cup of caramels and 1 Tablespoon of cream). Or feel free to use Date Caramel, especially if you want your bars to be vegan and/or dairy-free.
Nutrition
Calories: 126kcal | Carbohydrates: 11g | Protein: 3g | Fat: 9g | Saturated Fat: 3g | Polyunsaturated Fat: 1g | Monounsaturated Fat: 4g | Sodium: 54mg | Potassium: 95mg | Fiber: 1g | Sugar: 8g | Vitamin A: 1IU | Vitamin C: 0.01mg | Calcium: 9mg | Iron: 0.5mg
