Gluten-Free Corn Tres Leches Cake
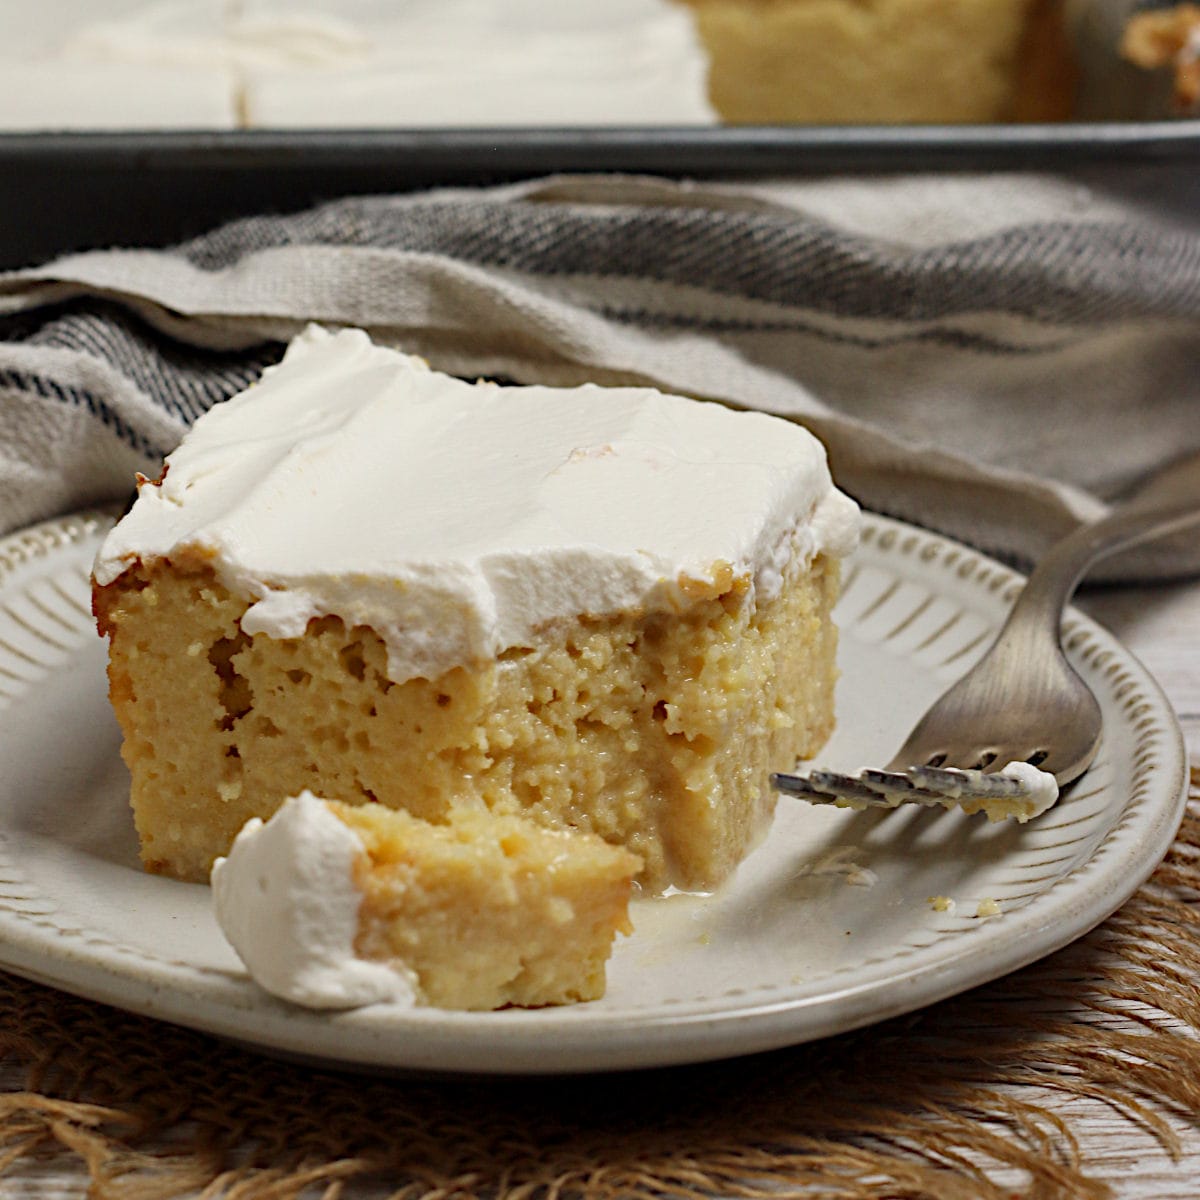
Gluten-Free Corn Tres Leches Cake is made from masa harina (or masarepa). It features a sweet milk soak and whipped cream topping.
A few years ago, I followed a strict gluten-free diet for several months to see if it would help improve my chronic disease (rheumatoid arthritis). It did not, but I learned a lot about following a gluten-free diet during that time. My 2 biggest takeaways were:
- Following a gluten-free diet at home was much easier than I expected, and following a gluten-free diet out (in restaurants, in social situations, etc.) was a lot more difficult than I expected.
- I vastly preferred gluten-free items that were not expected to be similar to their gluten-containing counterparts. This was especially true in the baked goods department.
While I didn’t find any gluten-free breads I liked, I embraced other gluten-free foods like tortillas and potato patties in their place. It’s also what inspired my gluten-free corn waffles recipe, which remains one of my more popular recipes.
This brings me to today’s recipe, which happens to be gluten-free: Corn Tres Leches Cake. Yes, it is a gluten-free cake. Will you mistake it for a regular gluten-containing tres leches cake? No. It is quite different, texture- and flavor-wise.
You can most certainly taste the corn, which is what I was going for. And the texture is a little coarser than a fine-crumbed cake, which is what I would expect from a corn-based cake. Is it good anyway? Yes – or at least I think it is. I’ll let you be your own judge.

How to make Corn Tres Leches Cake
Making this cake starts with mixing the dry ingredients that will be used in the cake batter. Simply whisk together the masa harina (or masarepa), cornstarch, sugar, baking powder, and salt in a medium bowl. Set this aside for now.
Next, stir together the milk and vanilla in a measuring cup. Set this aside, too.
Now it’s time to separate the eggs. This cake relies on beating the egg whites as part of its leavening. To accomplish this, it’s critical that you don’t get any yolk in the whites, or the egg whites won’t whip properly. Separate the eggs one at a time, adding them to the mixing bowl only once you’ve ensured that the yolk didn’t break. Place the yolks in a separate bowl to use later.
Add the yolk-free egg whites to the bowl of your stand mixer (or a large glass or stainless steel mixing bowl to be used with a hand mixer). Fit the mixer with the whisk attachment. Turn the mixer on medium-low speed until the egg whites appear frothy. Increase the speed to medium-high, and mix until the egg whites form medium peaks.
Add the egg yolks, one at a time, mixing until the first yolk is incorporated before adding the second, and then the third.

Sprinkle half of the masa harina mixture over the eggs, and use a spatula to gently fold the dry ingredients into the whipped eggs, trying not to deflate the eggs. Pour half of the milk mixture into the bowl, and continue folding until it’s incorporated. Repeat with the remaining masa harina mixture and then the remaining milk mixture. Let the batter sit for 15 minutes while you heat the oven.
While you’re waiting, prepare an 8×8″ square cake by greasing it with canola oil (or another neutral-flavored cooking oil), and sprinkling it lightly with masa harina. Turn the pan upside down over the sink, and tap gently to remove any excess masa harina.
Pour the batter into the prepared pan (it should have thickened slightly while it was resting) and spread it into the corners. Bake for 35-40 minutes until the cake is golden brown on the top and a toothpick inserted into the center of the cake comes out with crumbs clinging to it.
While the cake is baking, stir together one can of evaporated milk and one can of sweetened condensed milk in a large measuring cup.
Immediately after removing the cake from the oven, use a chopstick (or other similar long, thin item – be sure it doesn’t have a sharp end to avoid damaging your pan) to poke holes all over the cake. Be sure that the holes go all the way to the bottom of the cake.
Slowly pour the milk mixture all over the top of the cake, stopping periodically to allow the milk to absorb into the cake. If you get to a point where the milk no longer absorbs (you will see a thin layer of the milk mixture sitting on top of the cake), stop adding more milk (note that I added all of my milk mixture).
Cover the cake with a lid, a plate, or plastic wrap, and put it in the fridge to cool completely. Remove the cake 30 minutes before serving to allow it to warm up a little.
Add the whipping cream and sugar to a medium bowl. Use a whisk or hand mixer to whip the cream until it holds medium-stiff peaks. Spread the cream evenly over the top of the cake. Cut the cake into squares, and serve.
Store any leftovers, covered in the pan or in an airtight container in the fridge for up to 2 days.

Corn Tres Leches Cake Ingredients
- Masa harina (eg. Maseca) or masarepa (eg. P.A.N.) – masa harina is a corn-based flour-like product that consists of masa (nixtamalized corn dough) that has been dried and ground into a flour. It is often used to make corn tortillas. Masarepa is a corn flour product that is made of pre-cooked corn, which is not nixtamalized, that has been ground into a flour. It is used to make arepas. I have tried making this cake with both products, and they both work, with slight variations in flavor (the masarepa is milder, with a less pronounced “corn” flavor). Both are available to purchase in the Latin American aisle of well-stocked grocery stores or Latin markets. Both are typically available in white or yellow corn versions. For this cake, I recommend using the white version.
- Granulated sugar – you will be using granulated sugar in the cake batter, as well as a small amount to sweeten the whipped cream topping.
- Cornstarch
- Baking powder
- Table salt – if you use kosher salt instead, increase the amount to 3/4 teaspoon.
- Milk – any milkfat percentage will work. I used 1%.
- Vanilla extract
- Large eggs
- Evaporated milk – I recommend using whole evaporated milk rather than 2% evaporated milk, but both will work. Find evaporated milk in cans in the baking aisle.
- Sweetened condensed milk – sweetened condensed milk is available in cans or, less commonly, in plastic squeeze bottles. Find it in the baking aisle.
- Whipping cream or heavy cream – you will be whipping this with some granulated sugar to make the whipped cream topping that is found on tres leches cake.

Want more gluten-free dessert recipes?
Corn Tres Leches Cake Nutrition Notes
The nutrition information in the recipe below is for a slice of cake that is 1/8th of the recipe. If your slice is larger (or smaller) than this, the nutrition information will vary accordingly.
The nutrition calculations use 1% milk in the cake batter and whole evaporated milk in the milk soak.
This recipe is gluten-free as written.
Gluten-Free Corn Tres Leches Cake

Equipment
Ingredients
Instructions
- Whisk together 140 grams (1 ½ cups) masa harina, 100 grams (½ cup) granulated sugar, 28 grams (¼ cups) cornstarch, 2 teaspoons (1 teaspoon) baking powder, and 1/2 teaspoon (½ teaspoon) table salt together in a medium bowl. Set aside.
- Stir together 170 grams (¾ cups) milk and 1 teaspoon vanilla extract in a measuring cup. Set aside.
- Separate 3 large eggs, being sure not to get any yolks into the egg whites (it's best to separate the eggs one at a time, to reduce the amount of waste in case any of the yolks break).
- Add the egg whites to the bowl of a stand mixer and mix on medium speed until the egg whites hold a medium peak. Add one of the egg yolks and beat on medium speed until the yolk is fully incorporated. Repeat with the second, and then the third egg yolk, waiting for each to be incorporated before adding the next.
- Sprinkle half of the masa harina mixture over the egg white mixture and fold gently with a spatula, trying to avoid deflating the egg whites, until the dry ingredients are completely incorporated.
- Add half of the milk mixture and fold until the milk is completely incorporated. Fold in the remaining dry ingredients, and then the remaining milk. Allow the batter to rest in the mixing bowl for 15 minutes.
- While you're waiting for for the batter to rest, Move oven rack to middle position. Heat oven to 350°F. Grease a 8×8" baking pan with canola oil or butter and dust lightly with masa harina. Tap out any excess.
- Pour the batter into the prepared baking pan and spread evenly into the pan with a spatula. Bake until the top is golden brown, and a toothpick inserted into the center of the cake comes out with just crumbs clinging to it, 35-40 minutes.
- While the cake is baking, stir together 354 milliliter (14 oz) evaporated milk and 300 milliliter (12 floz) sweetened condensed milk in a large measuring cup or small bowl with a pouring spout.
- While the cake is still hot, poke holes all over the cake with a chopstick or skewer (make sure the hole goes all the way to the bottom of the cake, but avoid using something sharp to make the holes so you don't scratch your pan).
- Pour the soak over the cake very slowly, letting it soak in. If you get to a point where the cake will no longer absorb more soak, and there's a layer sitting on top of the cake after several minutes, stop adding more. Cover the cake with plastic wrap and cool completely in the fridge, at least 2 hours. Remove the cake from the fridge 30 minutes before sitting to warm up a bit.

- Just before serving, add 3/4 cup whipping cream and 1 Tablespoon granulated sugar to a medium bowl. Whip the cream at high speed until it reaches medium-stiff peaks (you don't want it to be so soft that it runs off your cake slices, but you don't want to overwhip it and turn it to butter either).
- Spread the whipped cream over the cake, then cut into squares and serve. Cover the pan with plastic or transfer any leftovers to an airtight container to store in the fridge for up to 2 days (note that this cake is best when eaten fresh).
Nutrition
Notes
Tried this recipe?
Please Consider Leaving a Review!


